Equipment
Digital Underwater Photography
Ever since I bought my first digital camera back in 1998 I'd been thinking about the convenience of taking digital snaps underwater. That (Sony Mavica) digital camera had a crappy, low VGA (640x480) resolution and used floppy disks as a storage medium so taking this underwater didn't make a lot of sense. I'd been getting my underwater slides scanned since 1996 so I could put them up on the web but the need to process film and then get the slides scanned at a bureau meant the procedure was neither quick nor cheap.
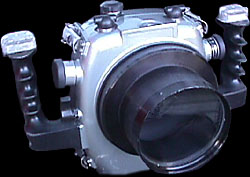
By late 2004 I'd decided it was time to make the switch from film to digital for my underwater snaps. I already had a Nikon D70 digital SLR camera and there were plenty of underwater housings available for it. After comparing the available housings I decided on a Sealux.
By March 2005 I was ready to start shooting digital underwater.
After having made 320 dives with my old Aquatica housing and film camera over a 15 year period I should have expected the new camera would take some getting used to.
On my first dive I had strobe problems with one strobe not firing at all and the other cycling (charging, then firing) continuously. For my first day's diving I was therefore restricted to available light exposures.
 |
Later I solved the strobe problem when I discovered that the sync cord connector to one of the Ikelite strobes had leaked at the strobe end. After rinsing and drying the connector it seemed to work OK and the problem was solved. I don't like the Nikonos V connectors on the new housing. My EO wet connector system used with the old houisng performed almost faultlessly and I miss the convenience of being able to easily plug/unplug the sync cord at the housing and be guaranteed that there will be no leaks. The Nikonos V connectors in comparison seem fragile and prone to failure.
 |
Taking underwater photos with the digital camera didn't take long to get used to and a number of major advantages became obvious.
To buy film and get it processed would cost me $20 to $30 per dive. With digital, this cost disappears. Sure, you need a decent computer but I already had one. I am no longer limited to 36 shots per dive. With digital, I regularly take 100 shots on a dive and have taken up to 300 on a dive where I had seal pups whizzing around me for an hour. I take a lot more photos now just because I can. I can be more experimental and more creative with the photos I take. Photography is to some extent a numbers game. You're looking to capture that unique moment in time and the more moments you capture, the better the chances of getting that fab shot. The National Geographic photographer with a Caddy carrying half a dozen cameras for him no longer has a big advantage over me.
With digital, you get some instant feedback on how your photo looks. Admittedly, it's a teeny little display on the back of the camera but it's WAY better than the nothing which you get with film. When taking pics of tiny nudibranchs about 6mm long I can zoom into the image after I've taken it and get a much better view of the thing than I can with the naked eye. On a liveaboard dive trip you can view your photos on a laptop computer after each dive or at the end of each day. Taking photos with film was more hit and miss because you usually didn't get to see your results for days or weeks.
Now, I can't imagine going back to shooting film with its associated cost, limitations and delays. I've still got the old film camera and housing but it will never ever get used again.
 |
In The Old Days We Used This Stuff Called Film
I bought my first real camera in 1986. At the time I was ignorant
of most things photographic so I think I was a little lucky when
I decided a second hand Nikon FM was the camera for me. Although
a very low tech model by today's standards, that old FM works today as
well as the day I bought it and the model is still well regarded by some old schoolers.
 |
After four years of reading every book and magazine I could get hold of on diving, I had become desperate to start taking my own underwater photos and bought a second hand Ikelite housing in 1987. It was the wide angle photographs that I'd seen in the magazines which best seemed to capture the beauty and excitement of the underwater world so rather than investing immediately in an underwater strobe (flash), I bought a 24mm f/2.8 Nikkor lens. It was at Goat Island on April 17, 1987 that I submerged this equipment and took my first underwater photographs using Kodachrome 64 film and natural light.
 |
My
choice to buy Nikon equipment right from the beginning was a lucky
one. Although more expensive than many other brands, the quality
of the camera bodies and lenses is unquestionable. The popularity
of Nikon gear amongst serious photographers has made second hand
equipment relatively easy to find and has encouraged independent
manufacturers to make equipment to suit Nikons. I've never been
keen on buying anything other than genuine Nikon lenses but you
have to rely on independent manufacturers if you want to buy an
underwater housing for a Nikon camera.
Another thing about Nikon which makes it dear to the hearts of many
underwater photographers is the Nikonos amphibious camera system.
The quality of the Nikonos system and its widespread use amongst
both amateur and professional underwater photographers has ensured
that Nikon equipment, whether amphibious (Nikonos) or housed (SLR),
is responsible for taking far more underwater photographs than any
other equipment brand.
 |
After
a few years of using the Ikelite housed Nikon FM I'd set my heart
on bigger, more beautiful camera housings. I'd already previously
purchased a Nikon F3 with MD4 motor drive and DA2 action finder
in anticipation of one day having a housing capable of taking them
underwater. In
November 1990 I purchased what was then a
Rolls Royce of underwater housings, an
Aquatica 3,
manufactured by Aqua Vision Systems in Montréal.
For me, this was a big step up in the quality (and cost) of camera
and housing and I hoped my photographs would eventually reflect
this.
The housing
can be purchased with an internal leak detector but I built my own
which works wonderfully and illuminates a bright red LED beside
the viewfinder when the contact probes located in the base of the
housing become wet. I used instructions from Discover Diving magazine's
January/February 1992 edition (part page 73 scan here).
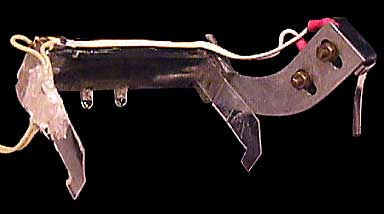 |
The housing can also be purchased with a viewfinder illuminator but once again, I built my own by making a plastic harness which clips to the front of the DA2 action finder. On this harness I fixed two LEDs which direct light into the F3's viewfinder illumination window. These LEDs are powered by a pair of 1.5V AA batteries via a micro switch located above the F3's aperture dial which allows the illuminator to be left switched off before the dive by pulling the Aquatica's shutter speed control shaft away from the body.
Over the years I have made some other subtle refinements to my housing and camera including filing a corner off MD4 motor drive's plastic battery holder to allow it to be removed from the motor drive without removing the camera from the housing, turning (with a lathe) down the housing's aperture and focus control knobs to remove the harsh milled half-round grips with a smooth diamond pattern knurl which is much more comfortable on the fingers (I don't use gloves in order to get a better feel of the control knobs), and replacing some of the aluminium alloy control shaft glands with stainless steel glands. The replacement of these glands has been very successful in eliminating what for me is the only major maintenance issue associated with using the Aquatica.
|
Nikon
Product Literature
|
|
| Nikonos V Brochure (3 pages, 464 KB) | |
| Nikonos V Specification Sheet (1 page, 47 KB) | |
| Nikonos V System Chart (1 page, 72 KB) | |
| Nikon Manual-Focus Lenses Specifications (1 page, 72 KB) | |
| AF Nikkor Lenses Specifications (1 page, 48 KB) | |
| Nikon F3 Brochure (3 pages, 556 KB) | |
| Nikon F3 Specification Sheet (1 page, 42 KB) | |
Despite always giving it a good rinse in fresh water after dives in the ocean, there is always a slow process of corrosion taking place in these control shaft glands where a stainless steel shaft rotates inside an aluminium alloy gland. This necessitates the regular disassembly, cleaning and re-assembly of each shaft and gland. When I don't do this often enough, I am faced with the unpleasant task of having to brutally extract a seized control shaft from its gland and then carefully sand away (with about 600 grit wet and dry sandpaper) the oxide deposits.
After
a while the housing's original white paint finish had become rather
scratched and shabby looking so I stripped off the old paint and
had it repainted in a swanky looking metallic silver. On one rough
boat trip back from the Poor Knights
Islands the poor old housing fell from a bunk and landed on
one of the handles which broke off. I carried out repairs with help
from Keith by machining up a new alloy base for the handle which
was then fixed to the housing with set screws.
To date, my Aquatica housing has logged over 310 dives without any
significant leakage. Although the Nikon F3 is now a rather old and
unsophisticated camera, I don't feel a strong need for autofocus
or other advanced features while taking photographs underwater and
am happy to continue using it for the time being. It is likely that
it will be a digital camera that will ultimately force my housing
out of service and into retirement. Already,
I look on enviously at other divers with cute little digital cameras
in plastic housings. The size and weight of my housing is starting
to make it feel like a dinosaur and up against an amphibious or
housed 12 megapixel digital camera with quality fisheye and macro
optics, it wouldn't stand a chance.
Lenses
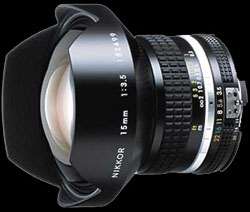 |
With the Aquatica's big 8" diameter dome port, a range of wide angle lens options exist. I already had an 18mm f/3.5 Nikkor lens and was initially happy using this as my wide angle lens. At 100° angle of coverage from corner to corner the 18mm is an ultra wide angle rectilinear lens and generally performed very well for me. However, with me and wide angle lenses, it was like wide was never wide enough and on my way back from my travels around the Indian subcontinent in 1992 I succumbed to my wide angle and Nikon obsessions in Singapore and purchased the rather expensive 15mm f/3.5 Nikkor lens. Before taking this beauty underwater I purchased a 1.279" extension ring which spaces the Aquatica 3's dome port away from the housing body in order locate the lens and port at the optimum optical position.
My underwater experiences with the 15mm lens turned out to be a bit of a disappointment. The lens really isn't a whole lot wider than the 18mm and suffers from the major disadvantage of being much more prone to lens flare. This can be a major problem when aiming up towards the surface and getting a sunburst in the top corner of the frame as you often do when shooting with very wide lenses underwater. The solution to my need for an ultra wide angle of coverage had not really been satisfied by the 15mm lens but the solution was obvious; fisheye.
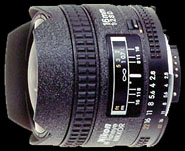 |
My friend Keith had had a Fisheye-Nikkor 16mm f/2.8 which I'd played with on many occasions over the years. I'd taken it underwater several times and was delighted with the underwater images it captured. The exaggerated barrel distortion of the fisheye makes it unsuitable for many topside applications where the distortion would be obvious but with few straight lines underwater, this is seldom a problem. The relatively low cost (compared to ultra wide rectilinear lenses), large maximum aperture (f/2.8) and excellent control of lens flare make it a very practical lens for underwater use. However, the extreme angle of coverage, 180° between opposing corners of the frame, does require the use of some special techniques.
Most of the best wide angle underwater photographs incorporate a close focus component in the foreground blended with a background focussed at close to infinity. The extreme depth of field of the fisheye generally makes focussing reasonably easy but to get the close focus component you do have to get very close to the subject or the exaggerated perspective of the lens will make any object appear very small and insignificant in the frame.
 |
The other major concern with the fisheye is strobe positioning. Unless the strobe or strobes are positioned well back from the camera body, a strobe body, a burnt out hot spot, or a plume of backscatter (brightly illuminated particles) can easily be accidentally included in the frame.
 |
The choice of lens for macro photography is a much easier one than the choice of wide angle lens. Nikon's Micro-Nikkor lenses focus from infinity down to reproduction ratios of 1:2 or 1:1 and as such, allow the underwater photographer to take large fish portraits where the subject could be 10 or 12 feet away as well as close up shots of tiny subjects just a few inches from the lens port. This kind of versatility simply isn't possible with Nikonos system where a choice between fish portraits or macro photography at a fixed reproduction ratio has to be made before the dive commences.
My
macro photography using the Aquatica housing started off with a
Micro-Nikkor 55mm f/2.8 lens which focussed down to 1:2 without
the use of supplementary extension tubes. This lens performed flawlessly
but when Nikon updated it with a 60mm model which focussed down
to life size (1:1), it became impossible for me to resist the temptation
to replace the 55mm lens with an AF Micro-Nikkor 60mm f/2.8 D.
Film
Right from my early days as an underwater photographer it was obvious
that slide film was the thing to use. I could see in the magazines
that all the serious underwater photographers were using slide film
and I'd been using Kodachrome for all my top side photography.
In those days, Kodachrome was the undisputed king of slide films.
It had been around for many, many years and it's fine grain structure,
fidelity of colour reproduction and archival qualities were well
proven. At 25 ASA, Kodachrome 25 was painfully slow, so slow that
its use was impractical in many situations but its fine grain was
regarded by most as unsurpassed.
The rule of Kodachrome 25 and Kodachrome 64 continued for me until
a small coup occurred in my world of underwater photography with
the publication of an article by Chris Newbert in the winter 1990-91
edition of Ocean
Realm magazine. This article by one of the world's most prominent
underwater photographers identified the new Fuji film, Velvia, as
having sharpness and colour saturation to rival or better the Kodachromes.
For many, the exaggerated, bright colours of Velvia and other new
E6 chemistry films were an inaccurate record of nature's colours.
To me, the Kodachrome colours were much more accurate than those
of the new pretenders but when put side by side, a Velvia slide
would almost always look a lot more appealing with its vibrant colours
than a Kodachrome slide.
The dropping of Kodachrome and adoption of Velvia by underwater
photographers seemed to happen fairly quickly and it's now many
years since I've used Kodachrome or seen anyone else using it. It
remains a fine film though and I look forward in the future to sorting
through the many Kodachrome images taken by my parents and grandparents
decades ago.
Strobes
Underwater flash guns are commonly known as strobes. For underwater
photographers, unreliable strobe operation can be a constant source
of frustration. I have a collection of three or four old strobes
which I have given up on and will never work again, but for several
years, I have had very few problems with strobes.
It's usual for a strobe to be connected to the camera with a sync
cord. This carries a signal from the camera to tell the strobe when
to fire. With the sync cord comes the need for a waterproof connection
to the strobe and camera and it is these connections that are frequently
the source of strobe problems.
At least part of the reason for my relatively peaceful relationship
with strobes is the Electro-Oceanic (E/O or E-O) connector system
I use. These wet connectors are completely watertight, whether plugged
together or not, and seem to provide a highly reliable connection.
In my early days I used a Ikelite
Substrobe 150 but in more recent years have almost exclusively used
an Ikelite Substrobe Ai/n with an Ikelite Substrobe 50 or Sea
& Sea YS50. These strobes aren't particularly large or powerful
but have provided me with quite satisfactory lighting and a high
level of reliability.
Digital Image Conversion and Manipulation
I started scanning the best of my slides and displaying
them on web pages in 1996. In those days, the only cost effective
way to obtain good slide scans was to use a bureau service. For
several years I used the Kodak Photo CD bureau service provided
by EIC Digital Studios
in Auckland. Later, high quality desktop slide scanning
machines became much more affordable and in mid-2002, I finally
bought myself a Nikon
Coolscan IV ED and started doing all my slide scanning myself.
At a maximum resolution of 2048 x 3072 pixels, Photo CD scans are
of ample resolution for most web page requirements and can also
provide good quality prints of reasonable size.
I use Adobe
Photoshop CS2 to crop, re-size, touch up and sharpen images
in preparation for displaying them on web pages. Although Photoshop
does a poor job of handling the Photo CD (pcd) file format, I find
the colour and contrast can be much better preserved by importing
the pcd images into Photoshop using Kodak's Photo
CD Acquire Module.
These pages are created with Macromedia
Dreamweaver MX.
Oh, and I have an Athlon XP 2000+ with 512MB RAM, 21" monitor
and enough CAT5 cabling running through this drafty old house
to connect Vibi, Sally and me with the world via an ADSL router.
© 2001-2006 ianskipworth.com